De-Mystifying Mazda RX-7 Ignition
Operation, John Thornton, Underhood Service, October 1998
The Mazda RX-7 is an infrequent visitor to our shop. On average, we
may see three to five of these vehicles a year for driveability concerns. It used to be
that much of our diagnostic time was spent re-learning the engine's support systems such
as fuel, emissions and especially the ignition system. I can still remember carefully
studying crowded ignition schematics while trying to determine what wire goes where and
what its purpose was.
This month's Diagnostic Dilemmas will try to explain the Mazda
RX-7's ignition system operation, and how the ignition systems (yes, systems - these
vehicles have two) can be evaluated in an efficient manner. We'll focus on late 1980s and
early 1990s RX-7s.
  |
Rotary Engine
Principles [go to top]
The best place to start this discussion is with a review of rotary engine principles. As
you know, there are two rotors in each rotary engine. Each triangularly shaped rotor has
three faces, or three combustion area surfaces. Each face of the rotor goes through an
intake event, a compression event, a power event and an exhaust event. Therefore, in one
revolution of a rotor, each rotor face has gone through all four events (intake,
compression, power and exhaust). Said another way, there are three power events, or
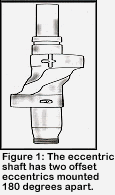
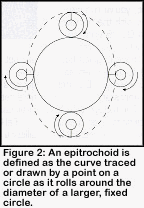
pulses, in one rotor revolution. Here's where things get interesting. Each rotor is turned by an eccentric shaft; we can call it a crankshaft. See
Figure 1. The eccentric shaft has two offset eccentrics (one for each rotor) mounted 180
degrees apart. This shaft allows the rotors to move in the shape of an epitrochoidal
curve.
|
| Figure 3 does a nice job of showing the
relationship of the two rotors and how they go though the four combustion events. What
does this all mean? Let's summarize with some key pieces of information.
- In one rotor revolution, there are three firing events or power
pulses.
- The eccentric shaft makes three revolutions for every rotor
revolution. This means the eccentric shaft rotates three times faster than the rotor. This
allows the rotors to follow the shape of an epitrochoidal curve.
- In a two-rotor engine, the eccentric shaft rotates through three
revolutions (1080 degrees) for six firing events or power pulses. Therefore, and this is
important, in one eccentric shaft (crank) revolution, an ignition event occurs every 180
crank degrees.
- The front rotor leads the rear rotor by 60 rotor degrees or 180
eccentric (crank) shaft degrees.
|
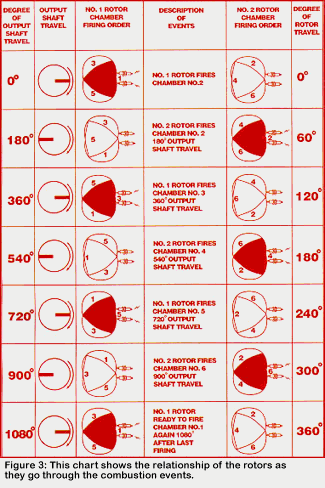 |
The above information becomes important when we start to examine the
relationships between ignition signals.
We also know that each rotor has two spark plugs: a leading plug and
a trailing plug. The leading spark plug fires at 5 degrees ATDC and the trailing spark
plug fires at 20 degrees ATDC. This 15-degree difference at the crank translates into 5
degrees at the rotor. Do you remember why? The crank turns at a 3:1 ratio to the rotor.
The purpose of the trailing spark plug is to continue the burn for more complete
combustion and reduced emissions. The leading plug is the lower plug in each housing, and
the trailing plug is the top plug in each housing. Fortunately, each plug hole is marked
with an "L" or a "T."
Starting in 1986, a crank angle sensor replaced the distributor. The
crank angle sensor looks like a distributor, but instead of a cap with wires at the top,
it has a removable inspection plate. Because of the crank angle sensor and loss of the
distributor cap and rotor, these ignition systems are known as distributorless.
Our next step in understanding this system is to review the
schematic. Figure 4 is a partial schematic from an RX-7. What is not shown are the crank
angle sensor inputs. However, Figure 4 shows all the wires between both igniters (leading
and trailing) and the PCM. We can see that there are four wires connected between the
igniters and the PCM, but what are their functions? How are the coils connected to the
igniters? These are just some of the questions I've asked myself when troubleshooting
these systems. Let's simplify and continue.
G & Ne Signals
[go to top]
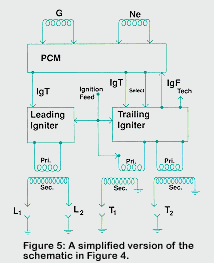
Figure 5 is a much simplified schematic. The G and Ne pick-up coils are located inside of
the crank angle sensor. Their output is sent directly to the PCM. IgT is the ignition
timing signal (trigger) sent to the igniters from the PCM. The igniters will not toggle
the primary without this signal. The leading coil (mounted in the LF corner of the engine
compartment) is a true distributorless coil. Both leading plugs fire together, even though
the rotors are 60 rotor degrees apart or 180 crank degrees apart. The two trailing coils
are mounted in the LR corner of the engine compartment.
 |
This is not a typical distributorless
system. You'll notice that there is only one IgT signal sent to the trailing igniter from
the PCM. Well, how does the trailing igniter know when to fire each coil with only one
signal? That is the purpose of the Select signal. The Select signal tells the trailing
igniter which coil to fire. We'll see how, shortly. |
We will now look at these signals in more detail and we'll study
some problems I've come across with these engines.
 |
If you were to remove the inspection plate or cover of the crank angle sensor, you would
see two teeth at the very top and 24 teeth just below the top two. The two-tooth reluctor
provides the G signal, which is rotor position information. The 24-tooth trailing coil
firing reluctor provides the Ne signal, which is rpm information and trailing-coil firing
synch. Like a conventional distributor, the crank angle sensor turns at half crank speed.
One crank angle sensor degree is equal to two crankshaft degrees, since the crank turns
twice as fast. Known good G and Ne signals are shown in
Figure 6. Channel 1 is Ne. Ne frequency is approximately 12 times as fast as G. This
should make sense, since G produces two signals to Ne's 24 signals per crank angle sensor
revolution. These signals were captured at approximately 1,360 rpm. |
Poorly Idling '88 RX-7
[go to top]
What do you think is going on in Figure 7? Something doesn't look right, does it? When the
inspection plate was removed on this crank angle sensor, I discovered one chipped tooth on
G and two chipped and slightly bent teeth on Ne. I'm not sure how this happened, but I
suspect someone was trying to adjust something with a screwdriver. This pattern is from a
1988 non-turbo RX-7 with about 82,000 miles. It had a very poor idle, and the engine acted
like it had a miss under load.
Both G and Ne are critical inputs; they should be checked if one
suspects primary problems or injector trigger problems.
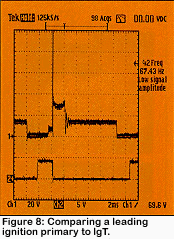
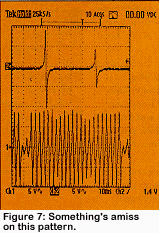
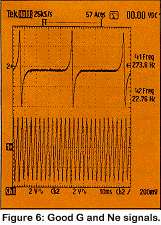
Figure 8 compares a leading ignition primary to IgT. Notice when the
0-5 volts IgT pulse goes low, primary dwell ends and the coil fires. For every IgT pulse
sent to the leading igniter, the coil will fire. This is a very good way to evaluate the
leading igniter's performance. (Compare input to output.)
By the way, the leading ignition system is critical for performance.
You can disable the trailing ignition system and the engine will start and run. As a
matter of fact, based on my testing, there won't be any performance concerns with it
disconnected. So, if you suspect an ignition issue, focus on the leading system.
  |
But, since the trailing system is important for
emissions reduction, it should be tested for proper performance. A few paragraphs ago, I
briefly mentioned the Select signal used by the trailing igniter. Fifteen crank degrees
after the leading plug fires, the trailing plug will fire. How does this igniter know
which trailing primary coil to fire? There is only one IgT signal for two coils. The
Select signal sent from the PCM to the trailing igniter determines which primary (trailing
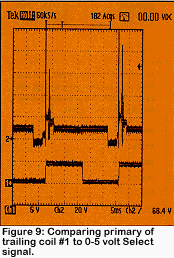
plug #1 or trailing plug #2) will fire. Please study Figures 9 and 10. Figure 9 compares the primary of trailing coil #1 to the 0-5 volt Select
signal.
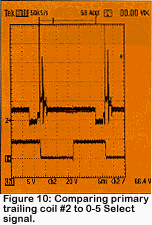
Figure 10 compares the primary of trailing coil #2 to the 0-5 volt
Select signal. What is different between these two?
Focus on the Select signal. Trailing primary #1 fires when the
Select signal goes from 0 to 5 volts, while trailing primary #2 fires when the Select
signal goes from 5 to 0 volts. So while there is only one IgT signal for both coils, the
trailing igniter knows which coil to fire based on the rising or falling edge of the
Select signal. Certainly, an interesting and unique approach. |
 |
 |
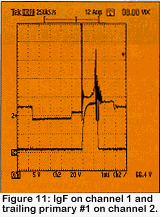
Finally, the last trailing igniter signal to discuss is
IgF. This is a feedback signal from the trailing igniter to the PCM. IgF is only produced
when trailing primary #l fires. There must be actual primary firing! Figure 11 shows IgF on channel 1 and trailing primary #1 on channel 2. Look
okay? Well, this about wraps things up, or does it...?
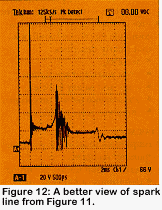
Take a close look at that primary pattern in Figure 11. What is
going on in that spark line? Figure 12 will give you a better view. Have you ever seen a
spark line look like that? About 1 msec into the spark line, extreme turbulence seems to
occur, lasting for about 0.8 msec, and the spark line remains flat. Both trailing
primaries have the same pattern. The leading primaries look normal. Overall engine
performance was very poor. I have only seen this pattern twice, and both vehicles were
RX-7s. The cause: retarded ignition timing due to improper crank angle sensor position. |
 |
Finding TDC
[go to top]
Now this next discussion is a real diagnostic dilemma. Properly installing a crank angle
sensor is pretty straightforward. The eccentric shaft (crank) marks are first lined up,
and a mark on the crank angle sensor driven gear is aligned to the crank angle sensor
housing. The crank angle sensor is then slid into its bore in the engine. Everything
seemed to be okay. But with the engine running, idle quality and performance could
drastically be improved by advancing (turning clockwise) the crank angle sensor. If I
advanced the crank angle sensor's position by one tooth, performance was better. A few
phone calls to a tech line, two Mazda experts and a little research said I needed to find
TDC.
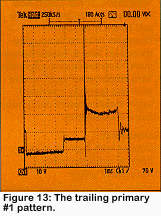
With a new TDC identified, I installed the crank angle sensor. Did
it work? I'll let Figure 13 answer that question. Figure 13 is the trailing primary #1
pattern. The spark line is back to normal, as is engine performance. As I mentioned, I've
run into this situation twice. I'm still not sure what causes the timing to change in the
first place. It must be something in the engine, but what?
Well, I hope I've shed some light on these very interesting ignition
systems. While most of us may not see these vehicles regularly, it can be very helpful to
have a good understanding of how known good ones work. This knowledge can reduce our
diagnostic time drastically. Good luck in your own Diagnostic Dilemmas!
Here is the procedure
I used:
- Remove both rear rotor spark plugs.
- Rotate the crank until you can see an apex seal (tip of the rotor) in
the trailing spark hole. The trailing plug hole is restricted, making the seal somewhat
difficult to see. Use a flexible light and a mirror. When the seal is seen, mark the
crank.
- Rotate the crank until you see the same apex seal in the leading
spark plug hole. This plug hole is not restricted, which makes it easy to see the seal.
Mark the crank.
- Halfway between your two marks is TDC for the front rotor (#1) rotor.
|
[go to
top]