First of all I need to mention
that all of the info on this site has been a result of a highly developmental
discussion on RX7club.com
I believe the original concept was brought up by Jeff20B and a lot of
test-bench development was done by Kent Abel (gsl-se addict).
That said, what has come to be has been a result of everyone's input into the
50+ page discussion which can be seen
here.
OVERVIEW / CIRCUITS / WRITE-UPS
|
|
|
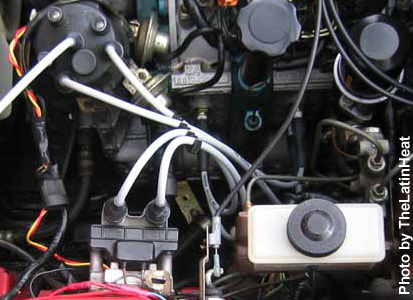
The 2GCDFIS w/ TT (2nd Gen Coil Direct Fire Ignition System with Transistor Trick) is an ignition system that allows the use of the 2nd Generation RX-7 coil and ignitor to work with the 1st Generation RX-7 ignition system. The goal is to gain the direct connection between the coil and the leading spark plugs (spark doesn’t need to go through the distributor cap/rotor). An additional benefit is the gain of a “late leading” spark. Both leading plugs fire every 180* of engine revolution instead of once every 360* as with the stock ignition. This creates an additional spark just before the exhaust phase of the combustion cycle. This helps to burn up left over fuel resulting in cleaner exhaust as well as possibly a bit more power and fuel economy. As you see in the regular 2GCDFIS threads (sans TT), the 2nd gen ignitor is removed and the coil is fired from the 1st generation ignitor. People have done this because the 2nd gen coil in normally fired from a 5v square wave produced by the 2nd gen ECU. The 1st generation ignitor is triggered by the VR sensor in the dizzy. This circuit (TT) acts to interface between the 1st gen ignitor and the 2nd gen coil/ignitor pack. This lets the 1st gen ignitor receive its signal as it normally does. Instead of firing the coil directly, it triggers the TT circuit which converts the signal to what the 2nd gen ignitor needs. The 2nd gen ignitor then fires the coil. There are several advantages to this. First, the 2nd gen ignitor is much larger so it can handle higher currents than the J-109 (name of the 1st generation ignitor). It has also been shown to keep firing strong until much higher RPMs than the J-109. I have tested the 2nd gen coil on the bench to the equivalent of over 14,000 rpm and was still firing strong. The third thing is that since the 2nd gen ignitor is doing all the work, the load is taken off the J-109. This means that the 1st gen leading ignitor should last much longer. UPDATE: (August 2008) The problem initially faced with the variable or fixed circuits was that the coilpack was entering current-limiting mode and this was generating a lot of heat - heat that was being made in the internal balast resistor, which would end up killing the coilpack. The solution to this is to change the balast resistor, or externally mount one, with suitable heatsink materials to help take the heat away from this. Balast Resistor Details If you open up the base of your coilpack you will see the built-in balast resistor. The aim is to replace this with either a single 1 Ohm 10W resistor (Kent - gsl-se-addict), or perhaps 4x 10 Ohm 10W(Sam - bad83) resistors in parallel. Some people have mounted them externally to help with heat dissipation, to materials such as copper or aluminium - being careful not to short any wires to them! The built-in resistor is 0.35 Ohms. |
|
The Different Versions of the TT circuit - v0.8 This is the variable pulsewidth only [ BEST OPTION ] - v2.2 Auto-switching with max pulse limiting + fixes - Development ceased due to design flaw - v3.0 Further Development - Coming next winter... or the one after that :) |
|
Simplified Circuit Design Install Write-up: http://www.rx7club.com/showthread.php?t=483858
|